This isn’t the third posting in the series I mentioned doing this month. No. No. No. This is the 3rd take I’ve had at trying to get the very first article posted. Between messed up scanners, camera’s and my own body parts it’s been a bit of a challenging week, but I’m tickled to say that just about everything is back in working order and I do believe I was able to piece together some card creation info into this blog post to assist those of you who have never ventured into making cards before. If you’re an ol’ pro at making cards you may still enjoy this series as I’ll be handing out some goodies along the way you may want to take advantage of.
Your Card Base.
One of the first things new card crafters may want to consider is stocking up on some pre-cut and folded card bases. The card base is the main piece of cardstock your card is made of. You can pick these up in most crafty stores and they are packaged with matching envelopes. These kits usually include only the basic single fold card. If you don’t care to purchase a set that’s pre-cut and folded, just measure the envelope you plan to create a card for and then cut and fold your own card base from card stock or whatever type of paper product you prefer to use for your greeting card. For a single fold card your base should measure slightly smaller than your envelope. Like by 1/8 ” or so in one direction. And it should be twice the length of your envelope (minus 1/8 inch) in the other direction. You’ll need to fold the card base in half on the long side. Later in this series I’ll share with you some fancier cuts and folds. But for starters lets just stick with the most basic greeting card. Although it is probably the most popular choice, these don’t always have to be made of heavy card stock. I’ve received cards from thin papers, fine linens, handmade papers, and all sorts of other paper types. So don’t feel you have to go with card stock for your card base. Work with whatever you like. I prefer a solid colored base, but here again – work with whatever your preference is.
Direct to Paper or Stacked on Paper?
As a scrapbooking and greeting card artists one of the things I learned years ago was to create my main designs on a piece of paper/cardstock separate from the card base, and then trim this paper so it fits on top of my card base. Now this is not a hard rule and there are times when I draw directly on the card base. But most of the time I do my stamping or drawing or special techniques on a stand alone piece of paper/cardstock first and then stack this finished piece on top of the card base using an adhesive or other fixture to attach it to the card. For me – there are two good reasons for using paper stacks. One is is because sometimes I botch things up, get things crooked, or smudge something that can’t seem to be fixed or covered up easily. It’s easier for me to toss out a single piece of paper I’ve not been successful with than it is for me to throw out my card base. the second reason is because I usually add a significant amount of color to my projects using all different types of mediums. Some of these colorful products require specialty papers (such as water color or glossy, etc.) and many of them also bleed through to the other side of the paper. The card base doesn’t always accommodate such things well when applied directly to the base. So the paper stacking method works best for me because it leave the door wide open for many different creative options. Of course there are times when I will do my card decorating directly on the card base. And if I’m drawing my own design I’m all for using penciled guidelines and an eraser!
Notes About Embellishments
I love to add buttons, bows, trinkets, flowers, and other wonderful things on my cards. However this does sometimes cause a bit of a challenge. For starters it may require a larger size envelope. Because I have all the tools to do so, I make many of my own envelopes customized to meet my needs, but it is something you may want to consider BEFORE you add all those wonderful little goodies if you don’t want to make your own envelopes. In the USA if your envelope won’t go through the automatic machines in the post office – you get charged extra postage for “hand-managed” mail. Extra embellishments many times won’t go through the machines. The golden rule on this is if it is a hard embellishment (button, charm, etc.) or something that won’t bend a little (chip board, etc.) then consider it to be a hand-managed item and include the extra postage.
If you like the idea of embellishments but don’t want to deal with extra postage or custom envelope sizes then consider soft, flat, and bendable extras. There are plenty to choose from. Take a walk down the scrapbooking isle in any crafty store and you’ll see all sorts of fun bling to meet your interests. I especially like sparkly things around the holiday season!
Following a Recipe
If deciding how to lay things out on the front of a card so they seem to balance out nicely is a challenge to you – no worries my friend. There are ways to get just the perfect layout every time. You simply follow card recipes. These are available in many places online and you can also create your own simply by looking at greeting cards you receive or find pictured online. Following a recipe in this case is similar to following a pattern worksheet. It’s more of a visual “how-to” guide than a step-by-step instructional worksheet. If you look at the diagram below you can see a set of recipes for some beginner level cards. the solid black line represents the direction of the card base (portrait or landscape). The solid gray lines represent where your design would be placed. And the gray dotted line is an indication of where you’d put your greeting.
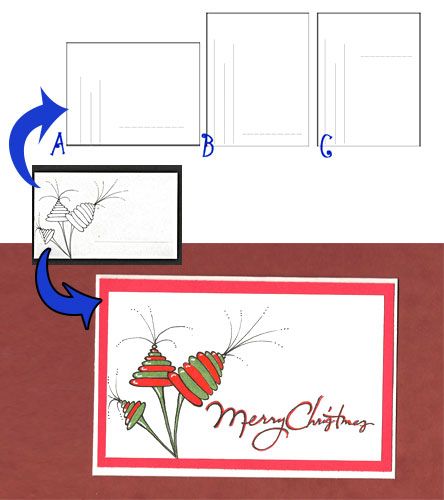
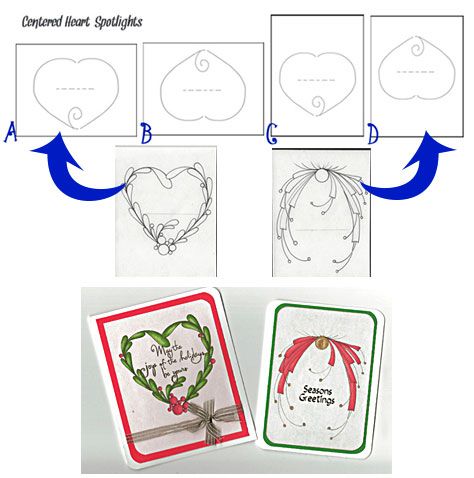
At the end of this article I’ve included a set of these beginner recipes that you can download and refer to for guidance if you want to. Notice how most any card recipe can be flipped to the opposite direction, or turned around and it will still make for a balanced layout on your greeting card. Even when the recipe calls for a specific shape such as a heart – you can still flip it around and play with that shape upside down. (Pssst….. check the bottom of this post for a link showing the pattern used on the right side example.)
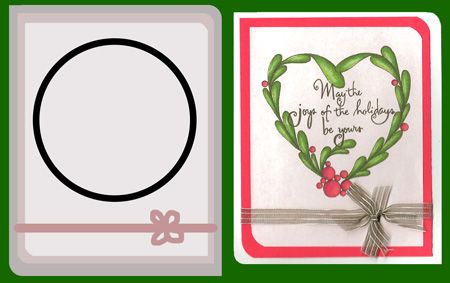
To make your own recipes from cards just sketch out a general shapes to show where things are placed on the card and then refer to that recipe later when you’re ready to do up another card. All card recipes can be used for greetings of any flavor, birthday, sympathy, annual holidays, thanks you’s, etc. Here’s another recipe card I made AFTER creating the card shown below. The recipe on the left simply shows me to place my main element on the upper portion of the card and center it. Wrap a ribbon around the top two paper stacks and tie it on the right side. It also shows a rounded corner punch idea on opposite corners only. See how this works. Easy, Peasy!
Choosing Patterns for your Cards
Now here’s where you can have all sorts of fun! I’ll cover patterns more in the days to come as I share with you many different ways to incorporate them onto your greeting cards. See the postings list below for more info on what’s to come. Now for todays card ideas I’m presenting greetings that feature a single pattern. Any pattern that you are drawn to is fine to use, but the idea here is to limit yourself to highlighting just one primary pattern on the front of your card. Many patterns lend themselves to looking like a particular “thing” you might want to include on the front of a card. Think outside the box on this. Does a pattern seem to flow well in a circle – maybe a wreath? Does it drape like a ribbons swag? Maybe it has holiday baubles built right into it.
Then again maybe you want to move away from traditional holiday elements and just have fun with a pattern. Add your favorite pattern using the layout formats in one of the basic recipes provided in the downloadable page and then add a greeting to the card and you’re good to go. I did this with my Phuds pattern. I don’t think there’s anyting Christmasy about that pattern, but I just went with it anyhow and added some colors I thought would fit the card.
Adding Greetings and Inserts
So here’s the thing with me on greetings. I do not like my own handwriting. Sometimes I can get it right. Most of the time I don’t do so well. Therefore I almost never use my own. If you can scribe beautifully then I am envious of you for sure and I applaud you for having such a wonderful skill! As for me I turn to rubber stamps, digital stamps, clip-art, word-art, stickers, rub-ons and other such goodies to fill this gap for me. Besides on the front of the card, I sometimes also include word-art on the inside. However, because I prefer the touch of a personally handwritten message in every greeting – I do also include my own (somewhat messy) personal message inside. 🙂 Visit the links below to pick up some word-art I’ve created for my cards if you are interested in using a similar method for adding greetings to your cards.
More To Come….
Here’s what I’m looking to include in this series. And I hope to post every couple of days or so….. That is if my scanner and camera will behave better than this past week! Both items are on the Dear Santa list for replacement this year. LOL
- Card Basics / Pattern Spotlight Recipes / New Pattern (This posting)
- Oh Tannenbaum / Stand-A-lones and Fun Fillers / New Pattern
- Simple Cuts and Window Ideas / New Pattern
- Let it Snow, Let it Snow, Let it Snow / The Flakiest Things
- Fancy Cuts and Fun Folds
- Series Wrap Up / New Pattern
Goodies for You!
- Pattern Spotlight Card Recipes – Click to Download
- Word-Art for Cards – Click to Grab Yours Today
- View the Video showing a few more Pattern Spotlight Cards and a New Pattern!
- Holiday Splash pattern worksheet – Click to Open and Download
Come Celebrate our LineWeaving.com 1-Year Birthday with us!
~Cindy



Just testing your commenting out – plus your card series is such a super idea as it’s not always easy to think how to incorporate line art with stamping etc…….
Paula (PEP)
Thank you so much for doing this!! I cannot wait to see more! I do hope your scanner/ camera work for you a bit nicer! Oh and your body too!! =)